Tonight I was talking to a friend and he asked me “How did you break in?” . . . meaning to the software industry, not a bank. Anyway, it ended up in a wall of text messages one at a time. Which he hates! Since he probably won’t read it I’ll post it here so even more people won’t read it.
I went to college and got into $60k in debt is the short answer.
At a shitty AZ school! (Side note, we talked about AZ schools earlier in the day and it was about how AZ is 48 out of 50 for education!)
While I was at ASU, I got a job at a web dev at the engineering school. They were teaching a new class that was going to “change engineering education” and I was hired to make and keep up the class website. It was the 90’s and that wasn’t really a thing then. Anyway, they had Cold Fusion so I made a site and kids could enter their SSN and get their grades! It was really cool if not a security nightmare. And I had my own cube on the 3rd floor of the computing commons. I had access others only dreamed of!
One day, a friend of mine from college who worked at this real estate company said “Our computers are always broken! Can you come and fix them?”
So I went to go fix computers but the owner of the company asked me about web development.
He sat me in a room asking me questions about being a web dev and eventually we made our way into the “server room” which was just a closet with tiny desk and the copier.
He wanted to see if I could change something on this web server.
It was VBScript and I knew Cold Fusion.
I don’t even know how I figured out where the files were stored.
I guess they both were on IIS or whatever came before IIS so I was able to look in some config or something.
Anyway, I changed something . . . I don’t know what it was but I got hired.
I got paid $15 per hour and I worked part time for a year and then full time for a year after that while I finished school.
Then a new company was formed . . . it was a startup! And I got a real salary of $50k or something close to it. It was crazy money!
But it wasn’t really much more than I made because before they didn’t take out any taxes.
2 years later I get a letter from the IRS.
I owed like $10k? or $20k with all the late fees. I don’t remember the amount but it was some amount that scared me.
It didn’t happen EXACTLY like that . . . . because now that I’m remembering, I also had an internship in there somewhere at Honeywell and I worked there a year on a “Fly by Light” system. And I remember how old I was . . . 21 . . . when I got my licence and a car! A Chevy Corsica. But the office was SO FAR and I quit after a year to take an internship at Motorola. But they didn’t hire me full time after the internship so I was out of a job. And I think that’s when I worked at ASU? And then the real estate company. I need to look at some old emails to piece this all together!
But the bigger picture is that it all happened for me because I was going to ASU and getting a degree in Electrical Engineering. That probably gave me some credibility back then.
This is a classic “you failed us” post. I’m so disappointed.
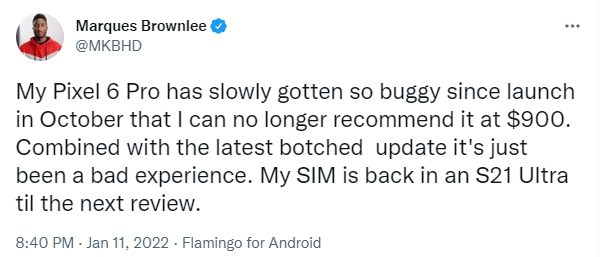
Recently a friend of mine typed that line, “Pixel 6 is trash”, in chat. I asked “what do you mean”? And he talked about how slow it was, how the updates have been flawed and people are having trouble, and even a few other things I forgot now. And I feel the same way! The update issue didn’t really matter to me but the ONE THING I care about most is quickly taking pictures. I double tap the power and half the time it doesn’t work and I see the camera for a second and then it goes away and the phone is locked. And then of course the fingerprint sensor is trash so I can’t get it unlocked and then by the time I get the camera going the moment is over.
Did I mention the fingerprint unlock is bad? It’s so bad I just have the phone unlocked all the time at home otherwise I would throw this phone at the wall it’s so frustrating. I’m considering just removing the fingerprints and just using a number every time.
Mostly it was just a mild cold and resulted in a runny nose, fatigue, and what I call a “fat lip” that was kinds like a cold sore. Still though it wasn’t great and it meant waiting in long lines for tests not to mention not being able to take Dex to the baby sitter, missed school, etc.
I put the whole thing about the cruise on Twitter but I’ll add it here too just in case. In case of what? I don’t know, just in case you don’t want to look at twitter?
The only thing missing from twitter is that I contacted them via email and this “case number” they gave me on the boat to get me to go away. They made it seem like Carnival would do something about it. Weeks later and they didn’t even reply.
Ran into more families that were surprised they were trapped on the Carnival Panorama on the only port day. Carnival didn’t communicate that “vaccination exemption” really meant “trapped”. We talked about how the Rachel Maddow MSNBC Story would go.
Customer Service lies and says they did tell us via email and while also saying it’s a new policy outside their control. At the gate to get off the boat, security lied and said we signed something.
Meanwhile, the boat is shut down since it’s a port day. And there is almost nothing a 0-4 year old kid can do. Not allowed in the pool. Can’t do kids club (starts at 5). No water slides. No rides. Internet sucks so no streaming. There are 3 TV channels. The list goes on and on.
They said we could do a “bubble tour” but of course we had no idea and there was no capacity when we looked (plus, you know that was going to be CHA CHING either way but that was nothing compared to being trapped).
There was NO COMMUNICATION! Nothing in the printed materials. I have several examples I could post where they didn’t say anything about “exemptions”.
In our case we went to leave the boat early (7:45) waited for at least an hour in huge crowds in the stairwells and it would have been longer if I wasn’t vigilant in that crowd. Others have stories were way worse.
The boat had at least 2-3 medical emergencies where we had to stop. We don’t know if it was related to covid but we also saw hasmat suits from our vantage point (WISH I took a picture!!).
Lots of children were crying aboard the Carnival Panorama this week. We talked to 4 families and none of them got concessions beyond a bear in their room and a bottle of wine. Everyone got a $50 onboard credit but that’s nothing and doesn’t address how kids were treated.
Last full day we had to subject the kids again to covid testing. I’m sure they brag about all the tests they do and while I appreciate it’s not the qtip up the nose for the kids’ sake, is the “test” they do really effective? Is it meant to make sure the positives are low?.
PLUS having to wait for hours before we could board with timeline after timeline slipping “we will have news at 2” “between 2:30 and 3” “by 4pm”. Always sounded like a threat “if you are allowed on board”. Even though we all jumped through hoop after hoop beforehand.
I gotta admit it was nice not having to cook and clean up Christmas dinner but that was the end of the fun on this ship. We get it was risky booking a cruise in the first place and in hindsight, we feel stupid.
We, of course, went to Carnival Customer Service but they just don’t seem to care. They have been hearing complaints all week I’m sure. Christine (carnival president) worked to clear us to arrive in Cabo but I guess kids are not a big enough market.
I don’t watch much news but this story seems compelling. I wish I had contacts at CNN, CBS, MSNBC and the like. And I would round up families all around the Carnival Panorama if it mattered but in the end, me writing this is my only concession.
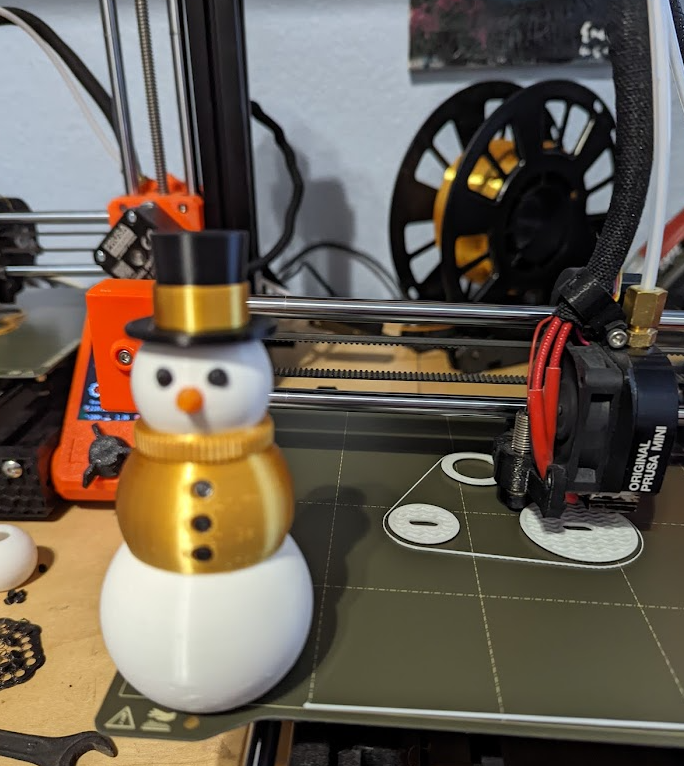
One of my favorite pastimes is to watch Youtube about 3D printers. At some point you get tired of reviews (especially if you have one and don’t want to lust over yet another one!) so you move onto prints and creators. One of my favorite creators is “3D Printy”. His designs are amazing and his videos are entertaining and tell you everything you need to know about the design and what you are getting into. Previously I had printed a “lockbox Pumpkin” and it was fun but took FOREVER to print so I only ever made two.
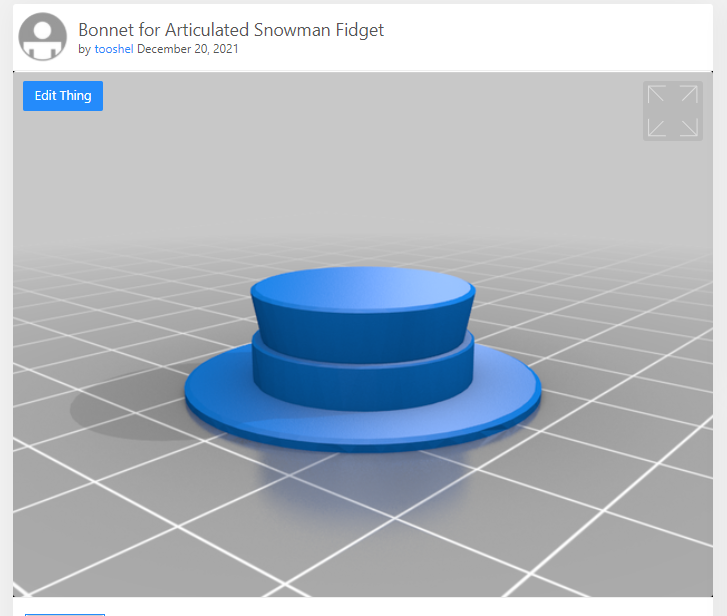
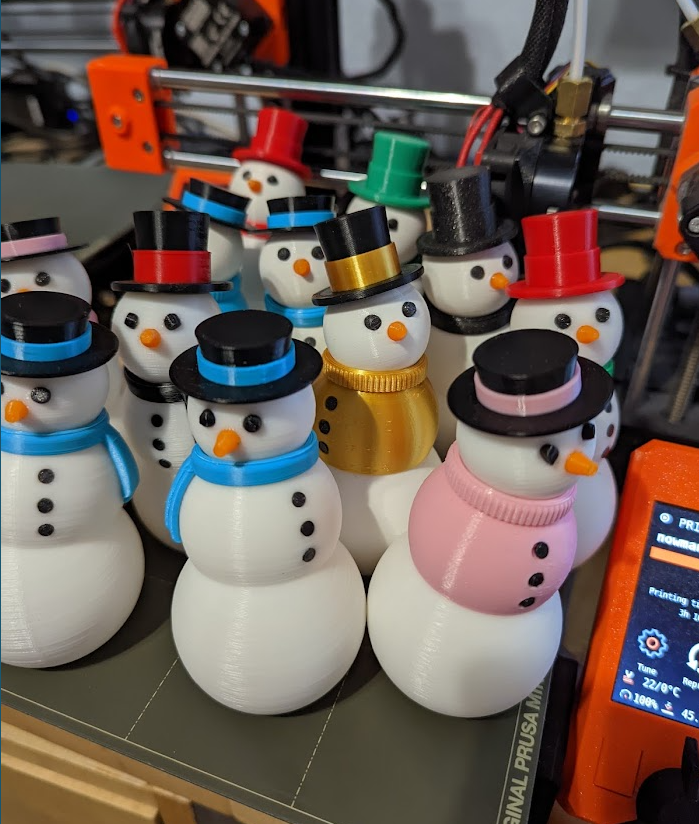
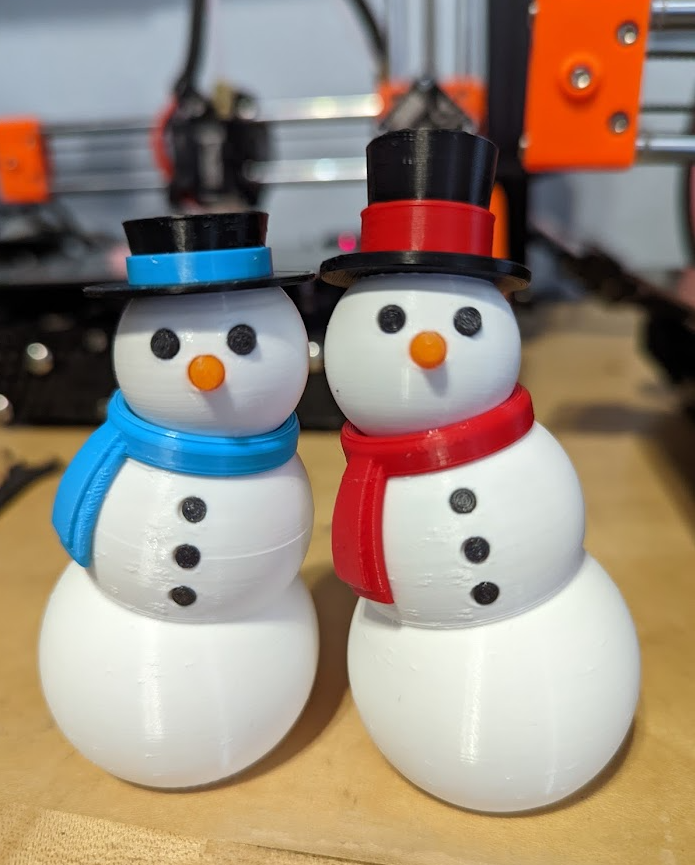
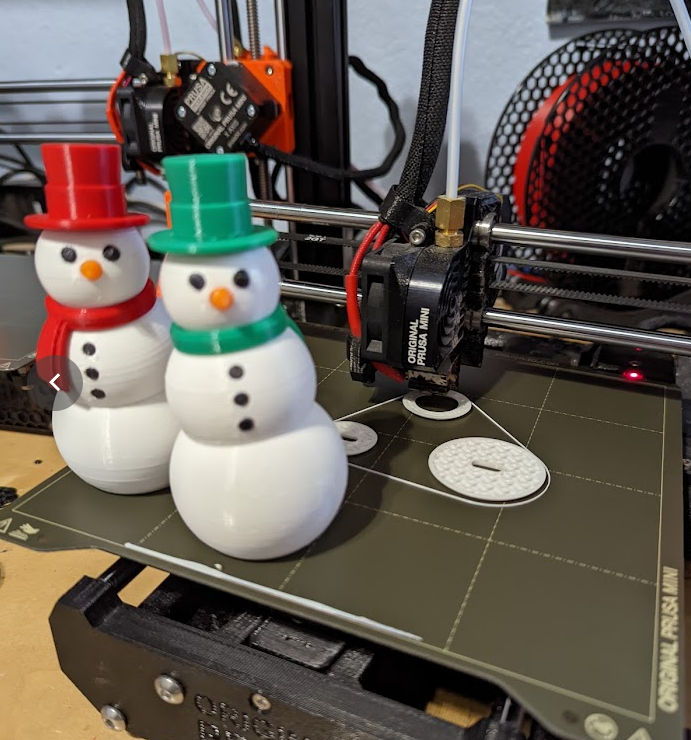
Recently he published a video about “3D Printed Snowman Fidget Toy” and it was fantastic as usual. I printed a few and the family thought the snowman was cute and wanted more. At first I just used Christmas colors, red and green, to make the hats and scarf. But then we (as in the family and I) wondered what a teal or pink one would look like. And then something wasn’t quite right . . . this is a snow “man” but what would a snow woman look like? I did a quick google search and it seemed the only real difference was the hat! So I got the hat STL, put it in TinkerCAD and shrunk it down and made the brim a bit wider. TADA! The bonnet was born. I posted my “makes” to Thingiverse and Prusa Printers and posted a picture on Thangs (since they don’t have makes). 3D Printy liked it and suggested I make a remix so I posted that too on Thingiverse and Prusa Printers (not on Thangs because makes and remixes are not a “thang” there).
My remix on Thingiverse
I know that gender and identity are sensitive issues and I don’t mean to suggest that one hat or the other has to go with one gender or the other. I happen to think that biology is complicated and gender isn’t binary in the way we have traditionally treated it. So wear whatever hat you want in whatever color you want! We have all combinations! 🙂
New Tricks
I also thought it would be cool to try out switching the filament and printing the stripe on the hat in a different color. Generally speaking switching the filament is the 2rd worst thing there is about 3D printing (after fixing them when they break) and is one of the more difficult tasks to do. (Scraping the print off the bed used to be the most difficult followed by leveling but that’s gone away thanks to magnetic beds and auto leveling systems.) On the Prusa Mini along with Prusa Slicer it’s SOOO EASY to switch colors in the middle of a print I wish I would have tried earlier. Now I have a new 3D printing tool for when I think up designs.
And I get it . . . it’s not THAT difficult to change the filament even on other printers but it’s almost always when I end up having problems with my printers so I still avoid it and want to just keep printing the same thing till the filament is gone!
Making them Gifts! And the pictures!
The family loved them so much that we decided to give them out as gifts to some of the teachers and staff at Patterson Elementary. I wish we had time to make one for every teacher there! They most certainly deserve it. Here are all the ones we gave away.
Gifts for peeps at PattersonBonnet and Hat example printsGolden Boy! We gave this to the principle of the school.The first versions before I figured out how to stop the printer and change filament. Still look cool on account of being Christmas colors.
For the last several years* Heatsync Labs has held an event called HAXMAS where card holding members keep the lab open for at least 48 hours straight. The idea here is that with the lab open you have time to MAKE the best Christmas gifts ever! Luis is the organizer of the event and takes on more than his share of hours at the lab and fills in any holes in the schedule. Generally I stay out of it on account of holiday season being busy. Between normal family stuff plus work stuff like trying to get this or that project either done or fixed and stable so that the team isn’t working over the holiday there just isn’t room for spending a weekend at the lab.
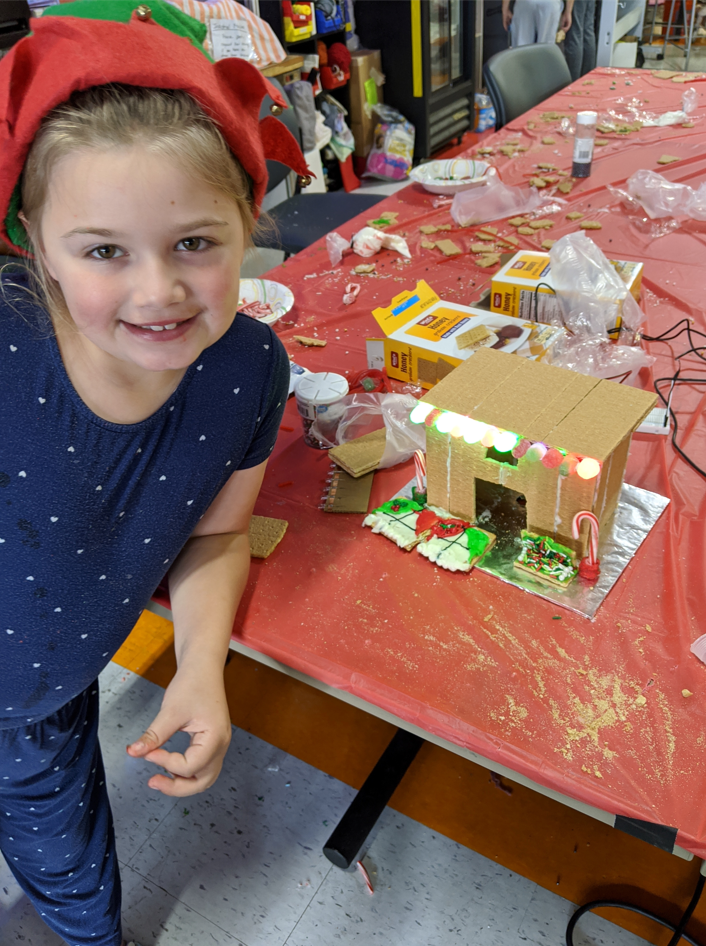
But this year was different! I asked my 9 year old daughter if she wanted to build LED Graham Cracker houses and spend the night at Heatsync and she said YES without even thinking about it! Normally I would have to try and convince her!
*Covid ruined every streak
TLDR Version
I ended up working on 3 projects!
Light up Luis’s bike for the Bike Mesa event (WLED on a couple of ESP32 boards, 4 strands of 50 of my favorite LED lights, a Jackery, and a big Bluetooth speaker and BOOM!). Status: complete and a success!
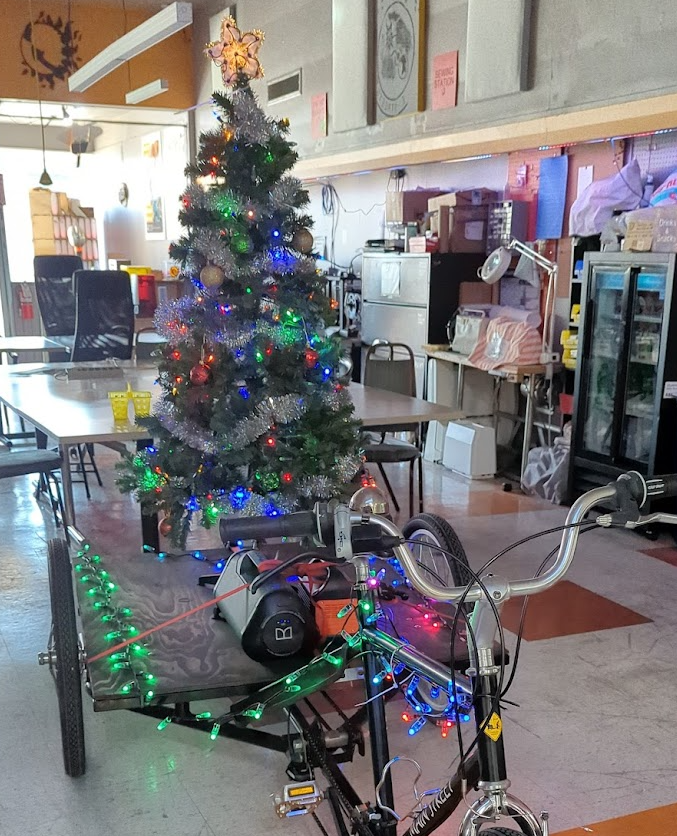
Christmas tree on a bike!
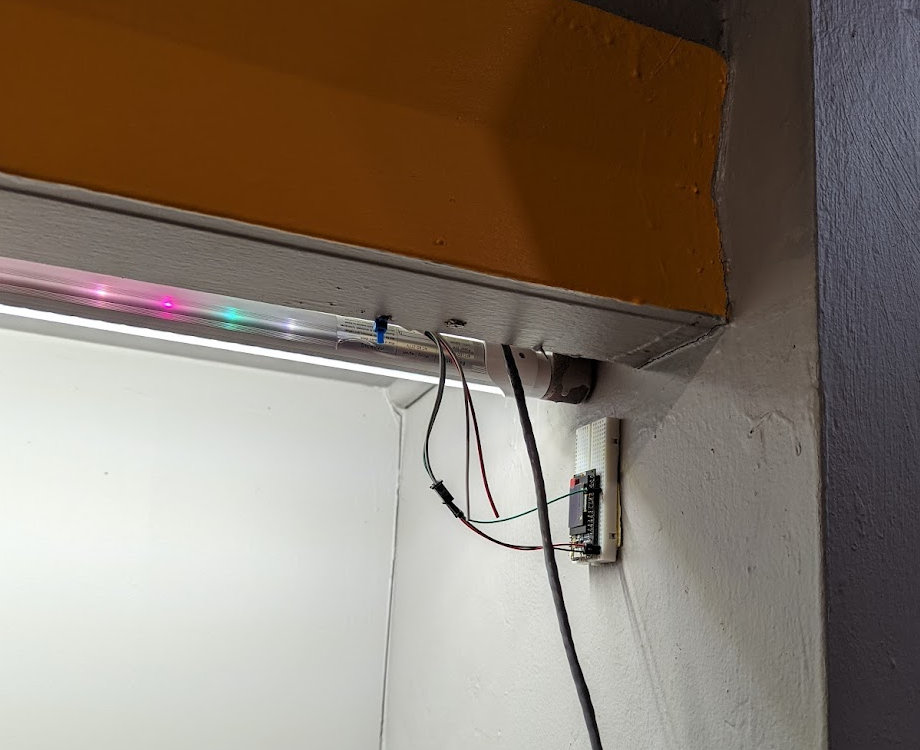
Replace the Arduino boards with ESP32 WLED for the LED strips in the Lab. Status: Need to get power injection working properly and needed more power. Plus, you can barely see the lights, maybe need to move them?
The new ESP32 mounted to the wall.
WLED controlled Graham Cracker house. Status: It works! But more decorations needed!
LES working!
PLUS! While were were there we saw an amazing community come together to support makers. There were many tours of the space and we entertained several people with Milton’s “mouse trap in a box” where you are invited to insert a quarter into a box and that would set off a mouse trap that would explode the box. Even when people knew it was coming they were surprised! They were also handing out laser cut wooden ornaments that could be decorated using paint or markers. How thoughtful! I wish we would have done more of that sort of thing.
Lighting up the Bike
On the FIRST FRIDAY OF HAXMAS I was planning on stopping by just to visit Luis and maybe work on some LED project. He told me about his plan with the bike via Twitter DM’s and I told him I have the solution to all his problems! The only issue was that I was going to ride my bike over and OH YEAH, also I have Dexter. He came to pick us up and thank goodness because we took a ton of stuff. The Bluetooth boom box, the Jackery 300, several bins of LED lights, another bin with tools and another with esp32 boards and other parts.
Then off to his house to get the GIGANTIC bike and the Christmas tree.
Once we finally got the the lab it didn’t take long to figure out what we wanted to do. We had to make sure the Jackery would last through the night (5+ hours) so we did some quick math based on the power consumption we saw on front of the Jackery. Even with 4 sets of 50 LED’s, plus the ESP32s, the power consumption was such that the Jackery would last 24 hours. So we added the incandescent star to the tree as well as the LEDs and our calculations told us it would still last way more than the 5 hours we needed.
The best part was when we were on a test drive and I played “Boney M – Mary’s boy child” on the way back to the lab and people were cheering. Here is it playing outside the lab!
Please don’t sue me Boney M!
ESP32 Controls for the existing light strips in the lab
Luis had an old Arduino board playing a “rainbow” but I thought it would be cool to put up a sign and URL and tell people they could control them from their phone on the Heatsync wifi. I replaced the boards but unfortunately there are a few issues:
The power injection that was there was not working. One of the power supplies was missing (which I knew about and brought a backup) but the other one was bad and was causing the lights to flicker. On the other side, the power injection is so far away that it won’t power the board so I need to get power to the board and to do that I need a power extension cable.
You can’t even see the LEDs! Even with the lights out they don’t make much of an impression. For a future project I want to move them to a more visible area and maybe add some diffusers.
Status: Still needs work! But if you are on the wireless at Heatsync and are lucky, you can go to http://wled-east.local and/or http://wled-west.local and control the lights!
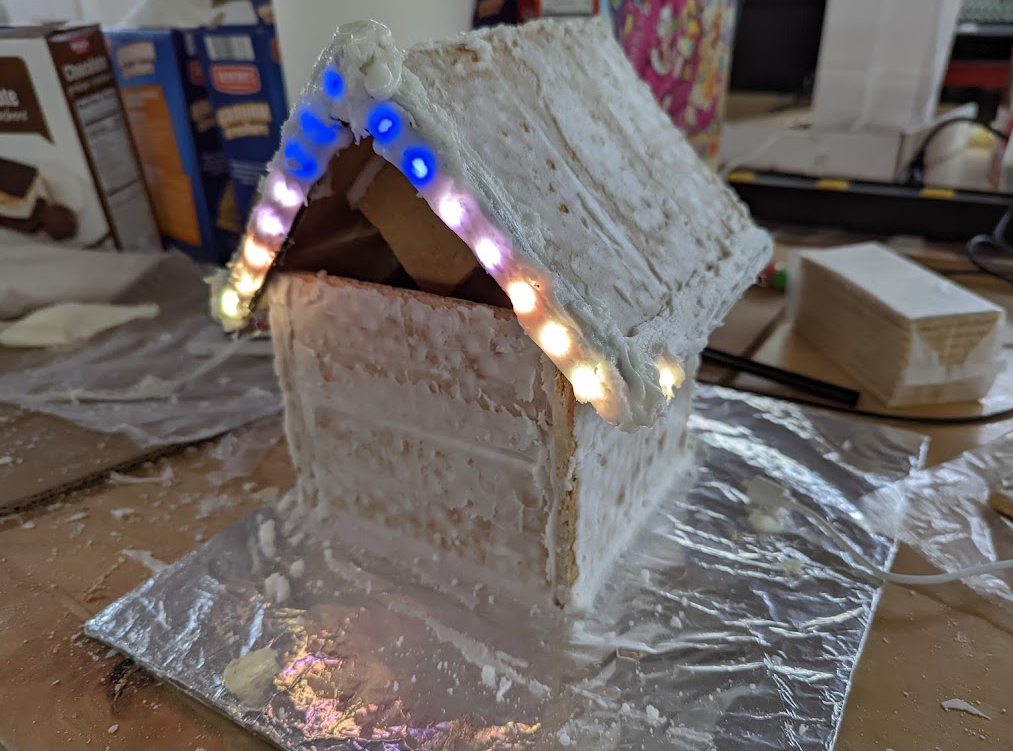
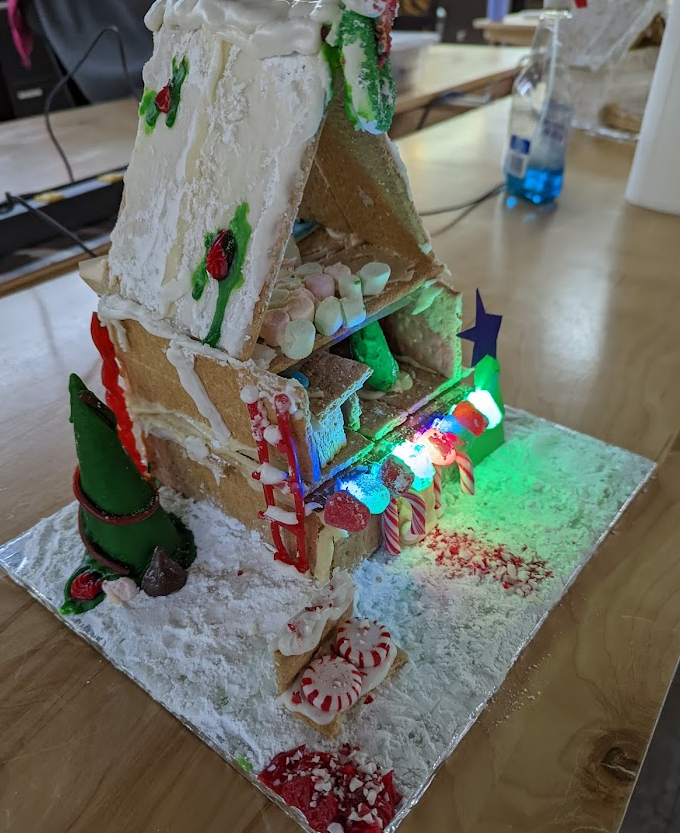
ESP32 enhanced LES Graham Cracker House
In the past we would participate in Eric’s “LEG Graham Cracker House” event. This is a picture from 2019.
And one year we even ran our own LEG Graham Cracker event for free for the GDG community sponsored by Google. We knew how to build our own. And, well, Eric created instructions so that anyone can build one! But we wanted to do a bit more!
Eric was running it again this year but we held off registering because we figured we would give others a chance to sign up. Sure enough it was sold out. But Eric was generous enough to leave the supplies at the lab so that other people could build their own.
The nice thing about having that many hours is there is no rush. I could use the frosting to glue 3 crackers together and let it sit for 30 minutes, no problem. I was even able to make the roof freestanding and completely held together with nothing but foodstuffs (usually I have to cheat and use cardboard).
Here is the result!
Yes, it needs more decorations! And I had to stop and let it dry since the LES strips (Light Emitting Sugar TM) were still fragile. But generally it was a success!
The most difficult part was soldiering the strips together. For each section I cut the strip along the solder points but since I got the IP68 version, the plastic coating was difficult to remove. I used this “silicon sheathed wire” that was very flexible and I also used hot glue on the ends to keep them in place.
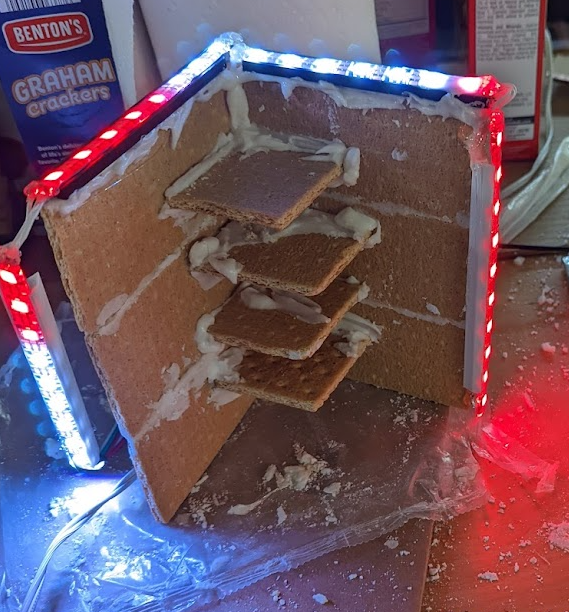
The roof as I was gluing it together and before frosting the LEDs
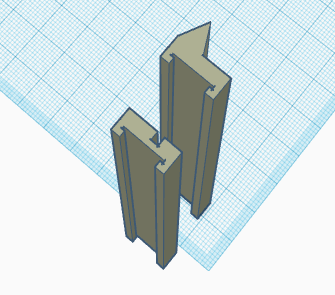
To keep the strip of LEDs lined up, I 3D printed some rails I made in TinkerCAD. This made them much easier to “sugar glue” them to the roof. The one with the triangle shape was for the roof “gutters” and the other parts were for the roof slopes that attached to the edge of the cracker.
My assessment is that this all needs to be refined alot more before we can unleash it on the public and do a class. But I bet Eric already has ideas for how we can do this better so hopefully he reads this and we chat more!
Conclusion
The entire weekend was SO FUN. Even though Embrie and I were tired and slept past noon on Sunday we had a really good time.
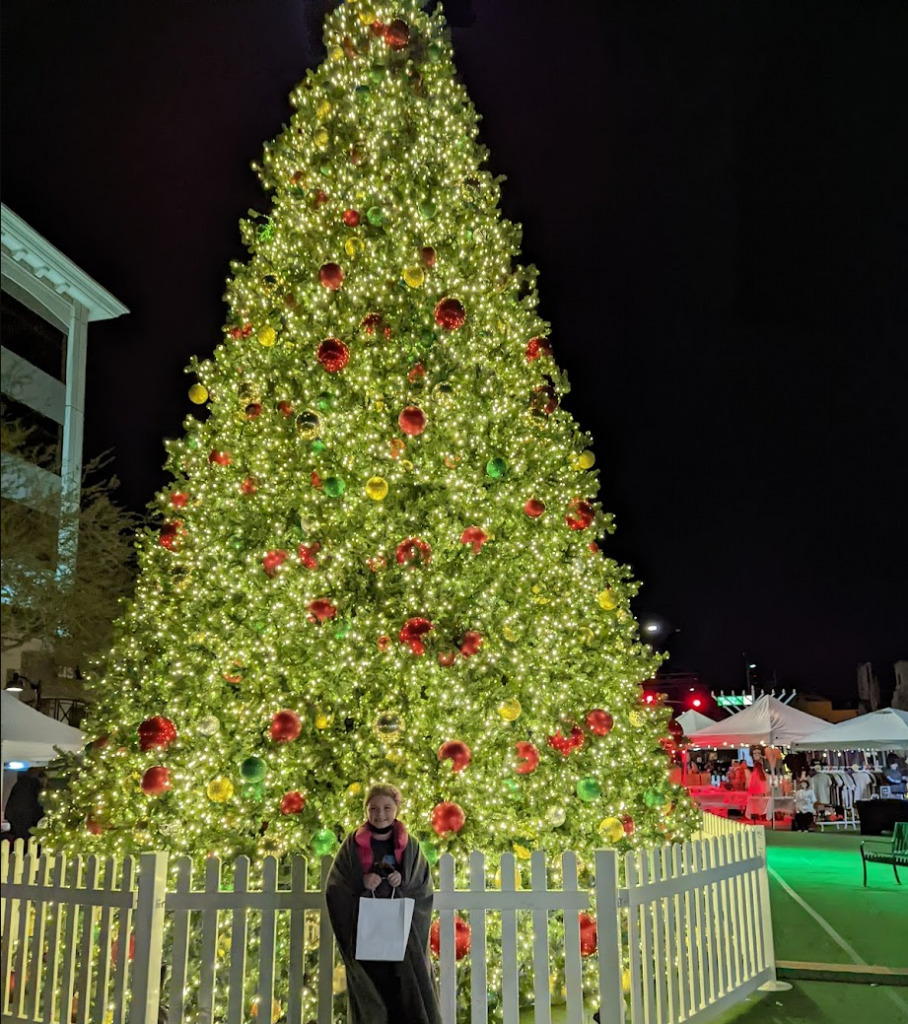
Mesa was full of excitement and had an event going on right next door with several makers and food vendors and a big Christmas Tree! Before we got too serious about hour LES house we spent an hour or so out there talking to people and just walking around outside. It was nice for us to get the chance to spend that time together.
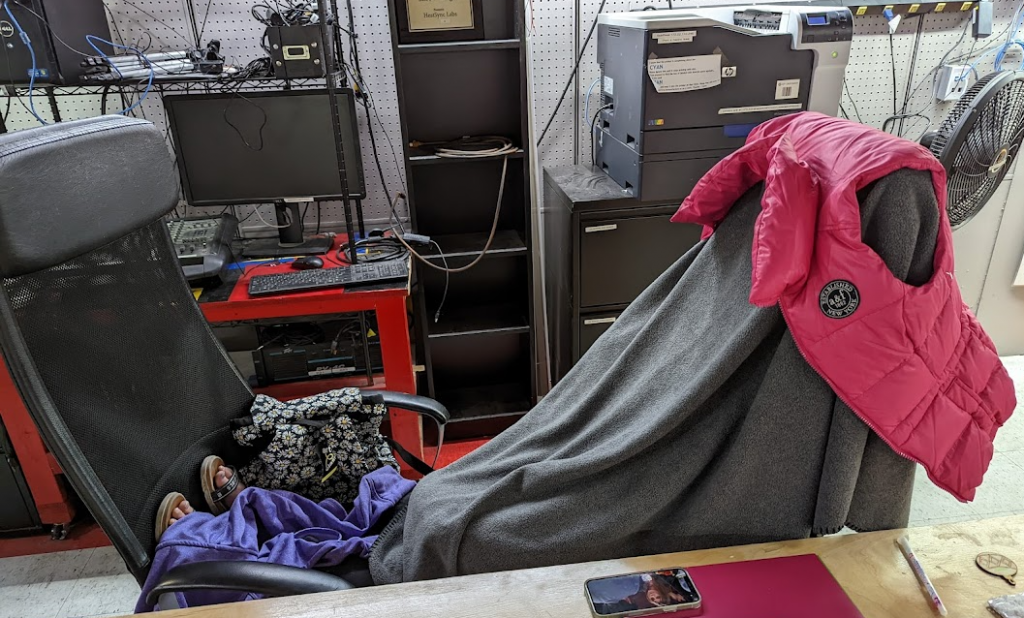
And she was such a trooper! She never complained, kept herself busy and even when her house was falling over and she had to rebuild she did it all without complaining. And at about 3:30 or 4am she quietly put the blanket over her chair and made a sort of “chair tent” and fell asleep. I took this at 3:57am and I don’t even know how long she was like that. Merry HAXMAS!
Sleeping in her Chair TentThe traditionally LEG house she made with no help. This is the second one, the first one fell apart.