SWMF 2022 Review . . . Hands on 3D Printing: Design -> slice-> print!

Here is a recap of how it went at Southwest Maker Fest (SWMF) for the 3D print “program” (that’s what SWMF calls the workshop exhibits).

At first it was just going to be Sarah and Embrie and I running a “maker” booth where we had laptops and printers and let people go though the 3D printing process. But then another person contacted Eric about a 3D printing booth and we all thought it might be a good idea to combine forces! That person was in the early stages of what he wanted to do but at the very least he wanted to inspire people by having a variety of prints on hand as well as have some printers going. Sarah and Embrie and I wanted to make it hands on and have people print something they made which we knew was a bit ambitious.

Unfortunately there was a family emergency and our extra help that wanted to do a booth had to bail out. That means we didn’t have any sample prints, extra printers, extra canopy for our extra space, or that 4rd person that could help people thought the process.

Original Idea

Here is the proposal I submitted.

Attendees in this booth will design and print something and see the 3D printing process from design to physical product (as long as they wait a bit for the print to finish!). In this space we will have four laptops and at least six 3D printers. We are targeting prints that take from 10-20 minutes and if all goes well the people waiting for prints can help those doing the designs.

We also have plenty of examples to show to get people excited about the possibilities. And we might just have a few goodies to give away to participants!

A more detailed description is that we will have a project idea that you can design yourself in TinkerCAD. Once you are happy with your design, you will export that as an STL file. Then, you open the STL in a slicer (PrusaSlicer or Cura depending on which printer you are targeting) and turn a design into a set of commands for the printer to execute (this is called a GCODE file). You then sneakernet the GCODE file to the printer and start the printing process.

Idea vs Reality

In the “examples/museum” area the idea was to have examples of different infills and patterns and layer heights as well as just some cool prints. Without the extra help we just couldn’t deliver on that. And I think that would have been a good addition for people curious and looking around but didn’t really want to commit to trying something out or waiting since there was usually a line.

Outside of that I think we delivered everything we said we would and a ton more!

3D Pens

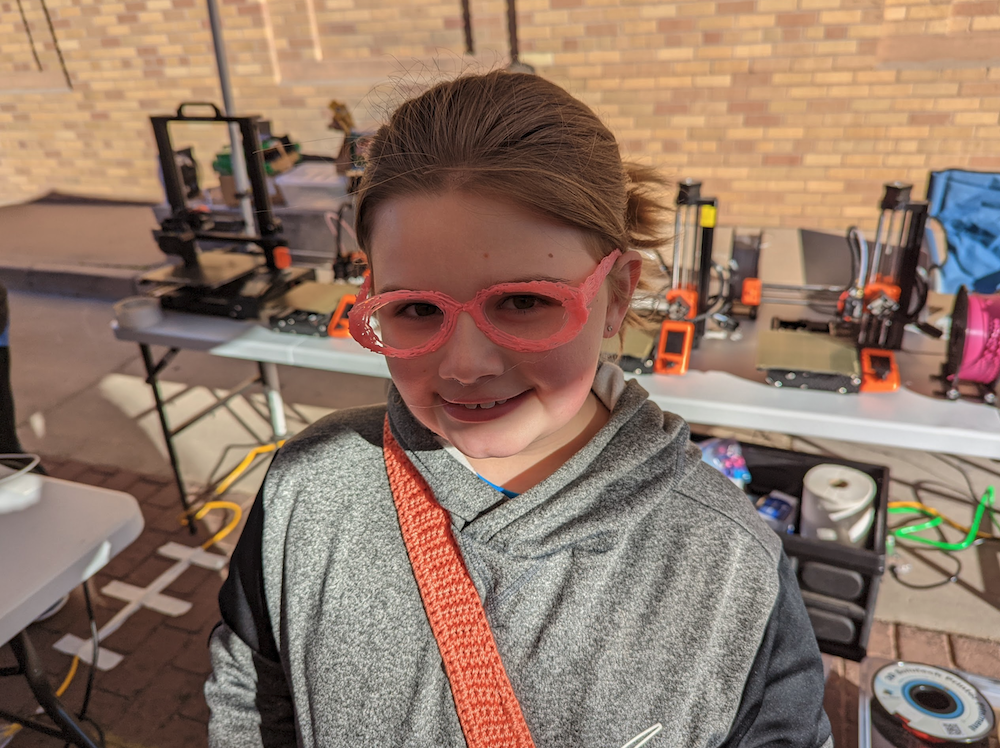
I thought it might be cool to bring some 3D pens that might be fun for a younger crowd or people that didn’t want to dedicate time to making a design or waiting on a print. We already had a couple 3D pens and my 9 year old daughter was really into them. I asked her if she wanted to run that part of the booth and she said yes! She spend a few hours in the days before finding some designs and paper printing “stencils” so that people would have ideas and have something to trace. As we were setting up the 3D Printing area she had extra time and made a pair of glasses for inspiration. People LOVED the pens and that tiny table with 2 working pens was busy the entire time. It was so overwhelming there was no room for Embrie! She said people were frustrated we didn’t have more pens!

3D Pen glasses! And a bit of the booth before it got busy.

Give Aways

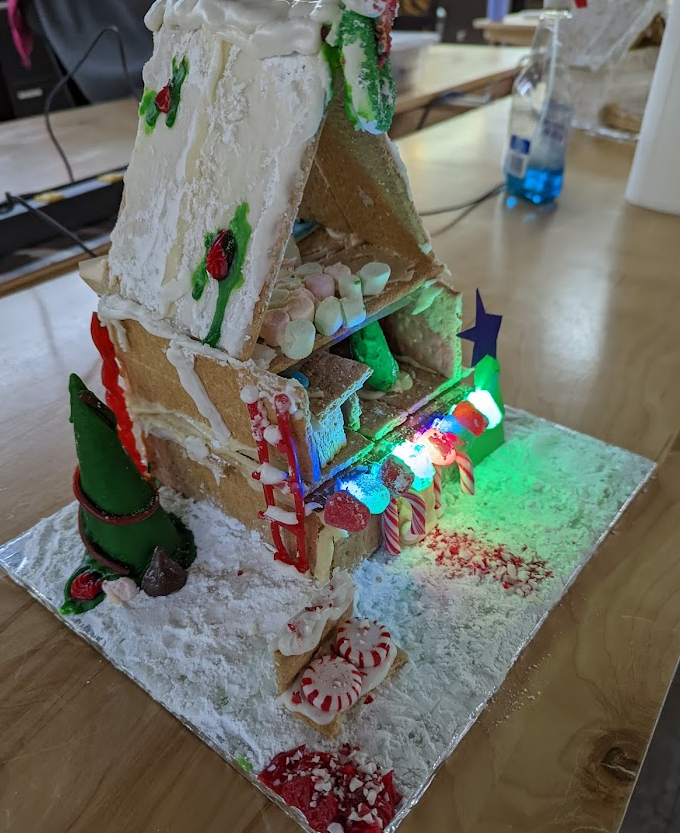
We had a few hundred of the “Brick Rings” to give out and probably gave away about 150 of them (they were at the super crowed 3D pen station so people didn’t see them). We also had about 50 “whistle rings“. We waited till the end and just put them on a table that was cleared off and let people take as many as they wanted as long as they took a sanitizing wipe too! It was probably a good idea to wait on those since whenever someone got them they tried them and it could be a bit annoying to have a bunch of kids trying a whistle.
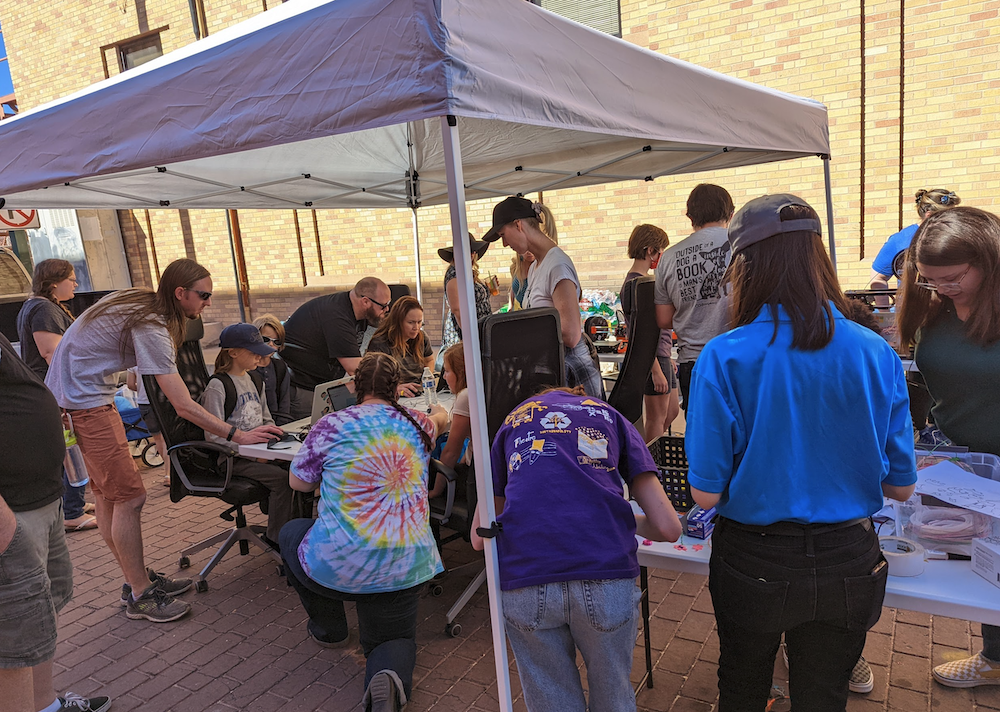
What we did

I WISH I would have taken pictures of the booth setup without a bunch of people in it but there really was no time. Even before we opened people stopped by and we started them on their journey.

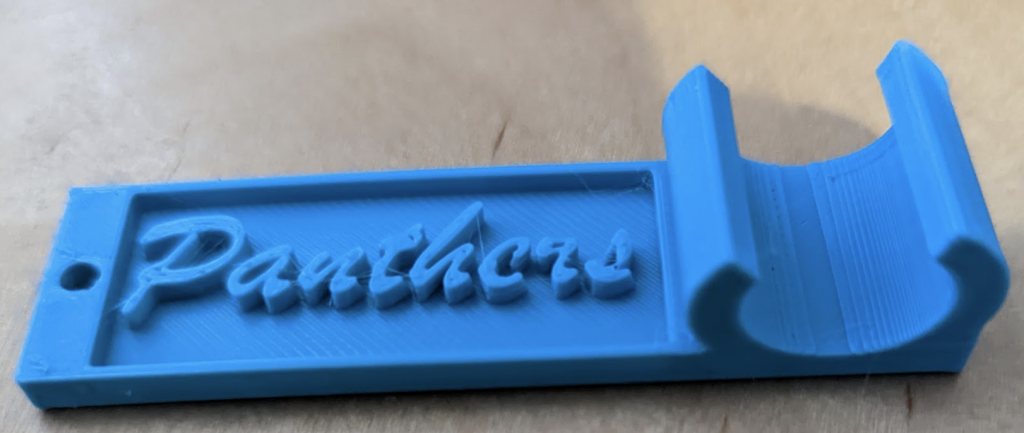
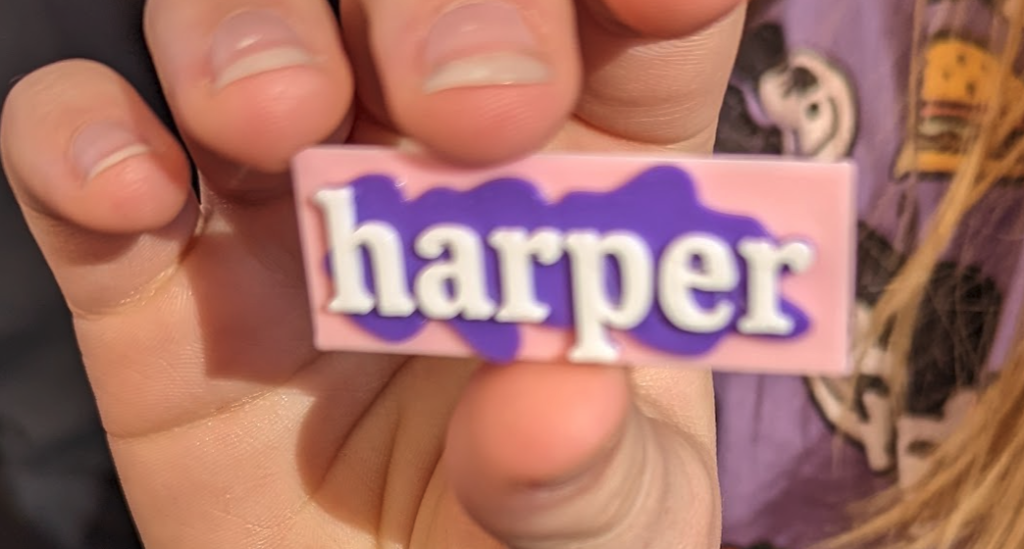
The only idea that we could come up with was to make a “5mm tall design that had your name in it that we could print in about 20 minutes”. One person wanted to print a “monopoly hotel” and I showed him how I could search for that and just print it . . . but I took it a step further and imported the design into Tinkercad and added a “B” to the side of the tiny hotel to make it B hotel. We printed it and I think he liked it . . I think . . . right about then a big crowd showed up.

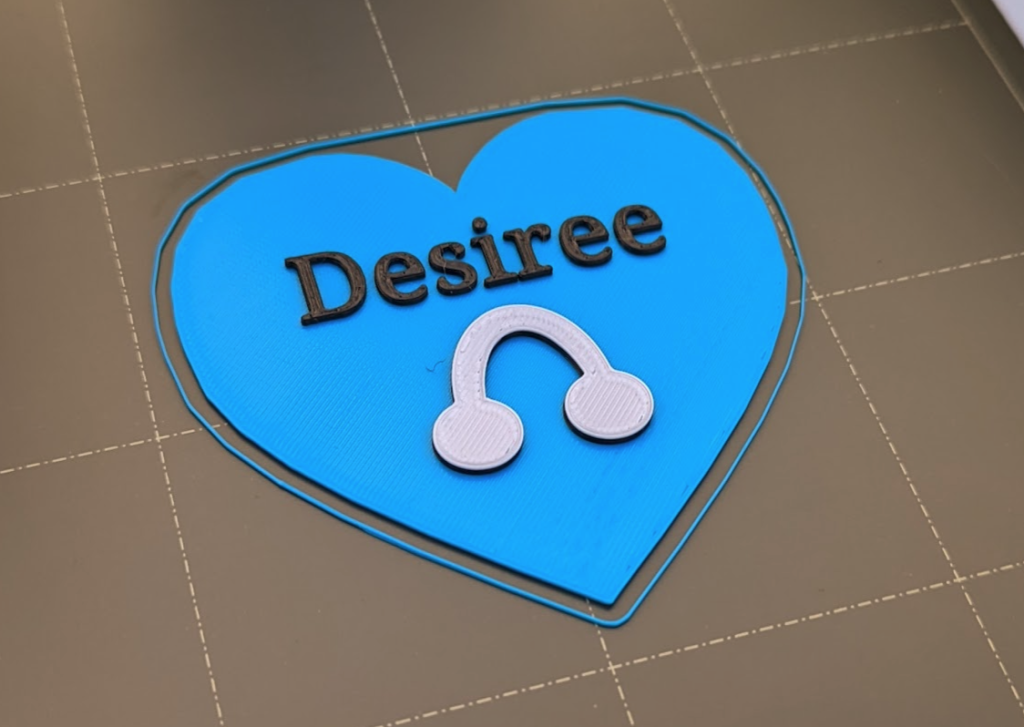
In PrusaSlicer we showed them how to put in a “filament switch” so most of them made 2 color designs (sometimes 3) and they were generally thrilled! Here are a few examples.

3 colors! And a heart! Nicely done Desiree.
Harper was THRILLED even though she wanted different colors it turned out great!

The printers

We brought along our 4 Prusa Minis (one that we donated to the school but borrowed) along with 2 Lulzbot Minis that were donated to the school recently plus the Creality CR6. The idea was that I would just have random stuff printing on the Lulzbot machines. That worked out fine on one of them for a few hours but the downside to those old machines was that it was nearly impossible to remove the prints without hurting yourself. And I couldn’t figure out why I couldn’t control one of them to load the filament in the 10 minutes I had time to try. At some point the UPS started beeping and turning off the Lulzbot fixed that. (Hopefully by adding removable beds and a machine running Octoprint those problem will be eliminated and I can turn those those into more friendly and modern machines . . . the quality and reliability seem good!) We didn’t have a slicer setup that would work with the CR6 and it was just taking up table room we needed so pretty quickly we set it aside. It was so much easier to use printers that were all the same and if we ever do this again that will be how we run it.

Tinkercad

We setup a new account in Tinkercad and every computer was already logged into that account. Generally we would give a 1 minute tutorial where I would make a moon shape or a washer shape by combining shapes and “holes”. We told them it was easy and generally people just picked it up and ran with it. Thanks Tinkercad! I was honestly kinda worried I would have to sit with everyone the entire time but generally people figured it out. I would go and clean up the design a bit and make the heights so it would print faster but that generally worked out okay. People were really creative! Moons and hearts and all kinds of designs beyond the “rectangle” I envisioned.

The Numbers

We setup a new account in Tinkercad and every design was saved there. At the end of the day there were 34 designs! My guess is that we printed 30 of them. We only printed on the 4 Prusa Minis (which was REALLY NICE since we could use defaults from the setup of PrusaSlicer to the exporting of the gcode). We had about 20 rolls of different colors of PLA filament.

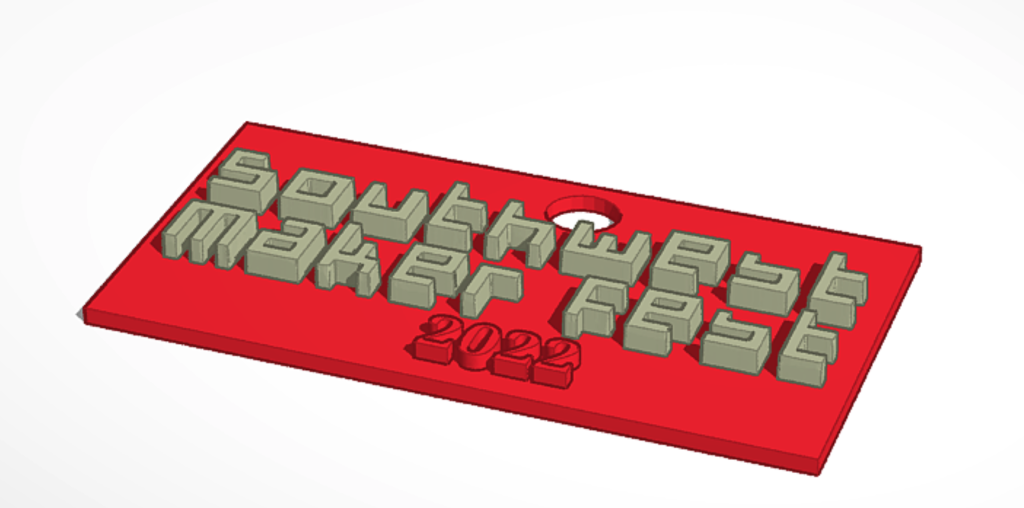
Those number line up with the reality of how busy it was. The event was 6 hours, prints took 20-30 minutes, we had 4 printers and 4 computers. Design time varied from 5 minutes to maybe an hour for the one person that wanted to make an ornament that had “Southwest Maker Fest 2022” on it and I showed her how to take the SWMF logo, cut out the text, import that image to a “jpg to stl” online tool, and then import that into TinkerCAD to clean it up. I do think we could have used ONE more Prusa Mini and there would have been less lines. 4 computers to every 5 printers seems about right for next time.

SWMF logo to STL in Tinkercad.

If prints took about 30 minutes on average, that means we had the capacity for about 48 prints (6 hours, 4 printers, 2 prints per hour) if everything went well and demand was even. In the beginning, people were designing and a few of the printers were not in use. By about 1pm, there was a line for the printers.

Problems to fix for next year

It was TOO BRIGHT to see the computer screens.

Our table arrangement made it TOO CROWDED and we need to spread out more.

People wanted more blue! We had about 20 rolls of different colors but people wanted blue more than anything and we only had this cool teal color. Also, it would have been nice to have duplicates of some of the basic colors like white and black.

We should scale up a bit for next time. 6 computers and 8 printers?

More 3D Pens! People loved them.

Examples! We didn’t have physical examples of the idea on account of JUST MAKING IT UP the day before.

We need better WRITTEN instructions about what to do and the size limits and stuff like that.

We need sponsors! While we didn’t go though a huge number of consumables, we did go though SOME not to mention the wear and tear on our own printers. Plus we did print the giveaways and that was probably a roll of filament all said. If we want to scale up we need a few more printers for sure. I honestly can’t believe they all worked without issue the entire time. I brought all my tools just in case but I wouldn’t have had time to fix anything anyway. I recently had to clean out one of of the print heads because of constant jamming and I had to replace the thermistor on my FIRST Prusa mini (it has more 3D printed parts than the new version) in the days before the event so I thought for sure something would happen but the only issue was that one of the filaments didn’t stick well even when changing the z-offset. We switched it out with different filament and an important lesson was learned. PLUS, we bought our own tables and a few other things too in support of the event.

We need MORE HELP. Sarah and I were going non-stop the entire day and could never sit down for more than about 30 seconds. We even had extra help from someone at Heatsync and even that wasn’t enough. Also the written instructions would have helped our help!

More thumb drives! We had 6 of them but one of them died and generally the line for a printer would be more fair if people could save to the thumb drive. I would say it would be cool if people had their own or we could give them away but cheap thumb drives don’t do well in the printer. I would say that one thumb drive for every computer and printer combined would be good. 8 in this case.

More pictures! Better contacts! Several people with nice professional cameras came by to take pictures (at least 3 different people asked if they could) but I don’t know who any of them were or where they might publish the pictures.

The rest of SWMF

I never left the booth. Not even to go to the bathroom. At the end of the day my back hurt so bad I wasn’t even sure I had to go. (Side note: I need to take a few pounds off!) I have no idea how the rest of the event went. But I know it as a success just in the sheer number of people that wandered back to our little corner. Seriously, there were at least HUNDREDS of people that were by our booth throughout the day. It might have only been 30 prints but it was crowded the entire day.

Conclusion

You might think when you read about all the problems above I think our program was a mess. Quite the contrary! Overall I think the event and our program in particular was a huge success! But I always want to make it better if we can. We were nervous no one would show up especially since we were in the back corner (which was by design because it’s where the power was). We were nervous that the printers might fail. After printing hundreds of the brick and whistle rings we started to worry no one would even want them. I was nervous no one would use the 3D pens and my daughter would be disappointed. But in the end it really worked out well. If you attended and you are reading this feel free to reach out on twitter @tooshel if you have feedback . . and it would be really cool if you had a picture of your print! We didn’t take enough pictures! That’s another problem to add to the list! 🙂

How did you break in?

Tonight I was talking to a friend and he asked me “How did you break in?” . . . meaning to the software industry, not a bank. Anyway, it ended up in a wall of text messages one at a time. Which he hates! Since he probably won’t read it I’ll post it here so even more people won’t read it.

I went to college and got into $60k in debt is the short answer.

At a shitty AZ school! (Side note, we talked about AZ schools earlier in the day and it was about how AZ is 48 out of 50 for education!)

While I was at ASU, I got a job at a web dev at the engineering school. They were teaching a new class that was going to “change engineering education” and I was hired to make and keep up the class website. It was the 90’s and that wasn’t really a thing then. Anyway, they had Cold Fusion so I made a site and kids could enter their SSN and get their grades! It was really cool if not a security nightmare. And I had my own cube on the 3rd floor of the computing commons. I had access others only dreamed of!

One day, a friend of mine from college who worked at this real estate company said “Our computers are always broken! Can you come and fix them?”

So I went to go fix computers but the owner of the company asked me about web development.

He sat me in a room asking me questions about being a web dev and eventually we made our way into the “server room” which was just a closet with tiny desk and the copier.

He wanted to see if I could change something on this web server.

It was VBScript and I knew Cold Fusion.

I don’t even know how I figured out where the files were stored.

I guess they both were on IIS or whatever came before IIS so I was able to look in some config or something.

Anyway, I changed something . . . I don’t know what it was but I got hired.

I got paid $15 per hour and I worked part time for a year and then full time for a year after that while I finished school.

Then a new company was formed . . . it was a startup! And I got a real salary of $50k or something close to it. It was crazy money!

But it wasn’t really much more than I made because before they didn’t take out any taxes.

2 years later I get a letter from the IRS.

I owed like $10k? or $20k with all the late fees. I don’t remember the amount but it was some amount that scared me.

It didn’t happen EXACTLY like that . . . . because now that I’m remembering, I also had an internship in there somewhere at Honeywell and I worked there a year on a “Fly by Light” system. And I remember how old I was . . . 21 . . . when I got my licence and a car! A Chevy Corsica. But the office was SO FAR and I quit after a year to take an internship at Motorola. But they didn’t hire me full time after the internship so I was out of a job. And I think that’s when I worked at ASU? And then the real estate company. I need to look at some old emails to piece this all together!

But the bigger picture is that it all happened for me because I was going to ASU and getting a degree in Electrical Engineering. That probably gave me some credibility back then.

Sheldon

HAXMAS 2021 at Heatsync

For the last several years* Heatsync Labs has held an event called HAXMAS where card holding members keep the lab open for at least 48 hours straight. The idea here is that with the lab open you have time to MAKE the best Christmas gifts ever! Luis is the organizer of the event and takes on more than his share of hours at the lab and fills in any holes in the schedule. Generally I stay out of it on account of holiday season being busy. Between normal family stuff plus work stuff like trying to get this or that project either done or fixed and stable so that the team isn’t working over the holiday there just isn’t room for spending a weekend at the lab.

But this year was different! I asked my 9 year old daughter if she wanted to build LED Graham Cracker houses and spend the night at Heatsync and she said YES without even thinking about it! Normally I would have to try and convince her!

*Covid ruined every streak

TLDR Version

I ended up working on 3 projects!

  • Light up Luis’s bike for the Bike Mesa event (WLED on a couple of ESP32 boards, 4 strands of 50 of my favorite LED lights, a Jackery, and a big Bluetooth speaker and BOOM!). Status: complete and a success!
Christmas tree on a bike!
  • Replace the Arduino boards with ESP32 WLED for the LED strips in the Lab. Status: Need to get power injection working properly and needed more power. Plus, you can barely see the lights, maybe need to move them?
The new ESP32 mounted to the wall.
  • WLED controlled Graham Cracker house. Status: It works! But more decorations needed!
LES working!

PLUS! While were were there we saw an amazing community come together to support makers. There were many tours of the space and we entertained several people with Milton’s “mouse trap in a box” where you are invited to insert a quarter into a box and that would set off a mouse trap that would explode the box. Even when people knew it was coming they were surprised! They were also handing out laser cut wooden ornaments that could be decorated using paint or markers. How thoughtful! I wish we would have done more of that sort of thing.

Lighting up the Bike

On the FIRST FRIDAY OF HAXMAS I was planning on stopping by just to visit Luis and maybe work on some LED project. He told me about his plan with the bike via Twitter DM’s and I told him I have the solution to all his problems! The only issue was that I was going to ride my bike over and OH YEAH, also I have Dexter. He came to pick us up and thank goodness because we took a ton of stuff. The Bluetooth boom box, the Jackery 300, several bins of LED lights, another bin with tools and another with esp32 boards and other parts.

Then off to his house to get the GIGANTIC bike and the Christmas tree.

Once we finally got the the lab it didn’t take long to figure out what we wanted to do. We had to make sure the Jackery would last through the night (5+ hours) so we did some quick math based on the power consumption we saw on front of the Jackery. Even with 4 sets of 50 LED’s, plus the ESP32s, the power consumption was such that the Jackery would last 24 hours. So we added the incandescent star to the tree as well as the LEDs and our calculations told us it would still last way more than the 5 hours we needed.

The best part was when we were on a test drive and I played “Boney M – Mary’s boy child” on the way back to the lab and people were cheering. Here is it playing outside the lab!

Please don’t sue me Boney M!

ESP32 Controls for the existing light strips in the lab

Luis had an old Arduino board playing a “rainbow” but I thought it would be cool to put up a sign and URL and tell people they could control them from their phone on the Heatsync wifi. I replaced the boards but unfortunately there are a few issues:

  1. The power injection that was there was not working. One of the power supplies was missing (which I knew about and brought a backup) but the other one was bad and was causing the lights to flicker. On the other side, the power injection is so far away that it won’t power the board so I need to get power to the board and to do that I need a power extension cable.
  2. You can’t even see the LEDs! Even with the lights out they don’t make much of an impression. For a future project I want to move them to a more visible area and maybe add some diffusers.

Status: Still needs work! But if you are on the wireless at Heatsync and are lucky, you can go to http://wled-east.local and/or http://wled-west.local and control the lights!

ESP32 enhanced LES Graham Cracker House

In the past we would participate in Eric’s “LEG Graham Cracker House” event. This is a picture from 2019.

And one year we even ran our own LEG Graham Cracker event for free for the GDG community sponsored by Google. We knew how to build our own. And, well, Eric created instructions so that anyone can build one! But we wanted to do a bit more!

Eric was running it again this year but we held off registering because we figured we would give others a chance to sign up. Sure enough it was sold out. But Eric was generous enough to leave the supplies at the lab so that other people could build their own.

The nice thing about having that many hours is there is no rush. I could use the frosting to glue 3 crackers together and let it sit for 30 minutes, no problem. I was even able to make the roof freestanding and completely held together with nothing but foodstuffs (usually I have to cheat and use cardboard).

Here is the result!

Yes, it needs more decorations! And I had to stop and let it dry since the LES strips (Light Emitting Sugar TM) were still fragile. But generally it was a success!

The most difficult part was soldiering the strips together. For each section I cut the strip along the solder points but since I got the IP68 version, the plastic coating was difficult to remove. I used this “silicon sheathed wire” that was very flexible and I also used hot glue on the ends to keep them in place.

The roof as I was gluing it together and before frosting the LEDs

To keep the strip of LEDs lined up, I 3D printed some rails I made in TinkerCAD. This made them much easier to “sugar glue” them to the roof. The one with the triangle shape was for the roof “gutters” and the other parts were for the roof slopes that attached to the edge of the cracker.

My assessment is that this all needs to be refined alot more before we can unleash it on the public and do a class. But I bet Eric already has ideas for how we can do this better so hopefully he reads this and we chat more!

Conclusion

The entire weekend was SO FUN. Even though Embrie and I were tired and slept past noon on Sunday we had a really good time.

Mesa was full of excitement and had an event going on right next door with several makers and food vendors and a big Christmas Tree! Before we got too serious about hour LES house we spent an hour or so out there talking to people and just walking around outside. It was nice for us to get the chance to spend that time together.

And she was such a trooper! She never complained, kept herself busy and even when her house was falling over and she had to rebuild she did it all without complaining. And at about 3:30 or 4am she quietly put the blanket over her chair and made a sort of “chair tent” and fell asleep. I took this at 3:57am and I don’t even know how long she was like that. Merry HAXMAS!

Sleeping in her Chair Tent
The traditionally LEG house she made with no help.
This is the second one, the first one fell apart.

Phone holder for Gilbert Days parade 2021

This year Patterson and some other Gilbert Elementary schools were asked to participate in the Gilbert Days Parade. Okay, okay, I don’t really know if they asked or if they had to pay to participate or how exactly it worked out that Patterson was going. All I know is we were going to walk the mile or so as a family with a few others from the school.

This isn’t our first time in Gilbert Days parade. I think this might be our 4th or 5th time? So many times I forget. Last time we also walked with Patterson and it was FAR DIFFERENT from the years before. The first few times we went with Gilbert Parks and Recreation because Sarah and I taught some robotics classes there back then. And Gilbert Parks and Rec goes ALL OUT and has a big float and a theme and custom shirts and people decorate wagons that go around the float and we had candy to hand out (BUT DON’T THROW IT!) and we had music and people were dancing and the float had swings on it one year. It was super fun! And it was clear they put a ton of effort into organizing it.

Two years ago when we walked with Patterson, it wasn’t like that at all. We literally JUST WALKED. That’s it. No decorations. Nothing to give out. No wagons. No music. Nothing.

This year we wanted to do something different. So I decided to use up all my open rolls of filament and print out as many phone holders as I could in the week I had to prepare. In total we printed 590 of them! We had 6 gallon sized ziplock bags full of them.

3 of the 6 bags we ended up having
YES! It looks like a bottle opener!

Generally people thought they were bottle openers. Which is kinda funny that an elementary school would be handing out bottle openers!

7 Colors!

We also went to Sams Club and spent $60 on 5 boxes of Air Heads (90 in each box). With that we had over 1000 things to give out! The kids with us were giving out the Air Heads and the adults had the phone holders. The candy was gone after about a quarter of the way! Pro tip . . . if you want a cool give away, get a spot in the beginning of the route.

ALSO . . . we took a couple of wagons (to hold the candy n stuff and hold any kids that got tired) and we had Dexter in his Jeep (that has a remote control).

Dexter in the Jeep in front of me

People LOVED the Jeep and for the 3/4ths of the parade, Dexter was crying. But I think all the cheering helped and he was happy by the end. The trouble is we had to get there 2 hours early and he was already done and ready to go by the time we actually started. Plus, I wouldn’t let him ride in the Jeep those 2 hours on account of not being sure if the battery would last. It ended up doing the parade route and then going on a loop all the way back and was still ready to go another mile!

This time . . . we even had a banner to identify the school!

Patterson Banner Practice before the parade started

Overall we had a ton of fun and the give aways were a hit! Probably. The parade goes so fast you don’t have much time to get any feedback.

Thanks URS! (and AECOM)

Today is my last day at AECOM (formerly URS). It’s been a wonderful 2 years and I’m thankful and grateful I made the leap. I’ve repeated this story many times but for the first few months after leaving ASU I thought I made the second biggest mistake of my working life (first being . . . well, ask me about that later). Looking back I can’t remember what it was that made me feel that way but I’ll never forget that sense of dread.

Now, 2 years later, I’m a better programmer, a better co-worker, and probably a better person. On a technical level, I know Javascript/node better, I understand far more about MongoDB, GIS, PostGIS, Jenkins/CI and the list goes on and on. I also finally worked on a big budget/big project where we had several programmers (and even divisions between front-end and back-end), several designers, testers, documenters, deployment/IT engineeris, etc. It was the biggest project I’ve ever worked on and it was a joy to get to learn what goes into this kind of work from Alex and James.

No job is a utopia but URS/AECOM was very close. Sure, it was annoying that I didn’t get time for training or to go to conferences (even when I was speaking at a conference by request I still had to use my own PTO time and work as much as possible). And when I moved to a new location in the building my cube rattled and monitors shook whenever someone came by. But those are small since I had plenty of PTO and had a flexible schedule so that I could work four 10 hour days to take a Friday off for a conference and could work from anywhere and didn’t have to go into the office, etc.

When I explain my AECOM/URS love people ask “then why are you leaving?” and it’s a good question because I do like it here. Sure, the new job is more money . . . but it’s not THAT much more. I think the main reason for leaving is that so many others have left and I not sure there is going to be another big contract to continue the work I was doing and I wanted to be able to leave on my terms not when suddenly there was no more work.

Another thing I get after working here 2 years are some great connections and dare I say . . . friendships? Chris Hogan left not long after I started (and he worked out of the Germantown office so I never met him in person) but he was the first real connection I made and we still chat from time to time to this day and even met up at a conference and will do so again someday. James Fee is the main reason I left and went to URS (he did that “do you want to sell sugar water the rest of your life” speech but relevant to what I was doing) and I’m glad he convinced me to go and then went on to patiently explain GIS and what it means to work on a big project. . . . I think we have forged a friendship that will last as long as he can stand my . . . loudness?. Rachel Wagner was a great boss and I learned a ton about the company culture from her even as I made fun of the company culture. She was patient and was a great communicator (i.e. she listened!). Alex Bostic . . . I can’t say enough about this guy . . . he’s an amazing developer/architect and I learned a ton but besides that he’s just “good at life” . . . things that would be so irritating to me were put into perspective thanks to Alex. Thanks!

I worked with so many others on projects big and small but I don’t have time to write about every one of them. Huge thanks to Lauren, JP, Darla, Bose, Bing, Asa, Manuel, Robert, Jason, Bill, Patty, John, and finally, Robin, who I never really worked with but knew her because she happened to be close to my cube and always very personable.

On to the next! I start my new adventure Monday and after few months I’ll let you know if it was a big mistake! 🙂

Sheldon

P.S. This is what I sent to my colleagues at AECOM:

Hello!

As most of you know today is my last day at AECOM. It was an amazing 2 years and I’m so glad I listened to James and decided to make the leap. I really am sad to be leaving and enjoyed my time here. I learned a ton, met many amazing people, and am immensely grateful for the opportunity. 

When your biggest complaint is that your new cube desk shakes when people walk by you know you have it good. Thanks AECOM! I hope you’ll have me back someday!

Feel free to reach out anytime at sheldon.mcgee@gmail or on twitter @tooshel. 

Sheldon